
TL;DR
The most impactful way to reduce noise and improve sound in a closet rig isn’t just absorption — it’s strategic placement, sealing gaps, and ensuring good ventilation. Properly treating the space and understanding the difference between soundproofing and acoustic treatment can turn a tiny closet into a usable recording or streaming studio.
Acoustic dampening
& the rig in the closet.
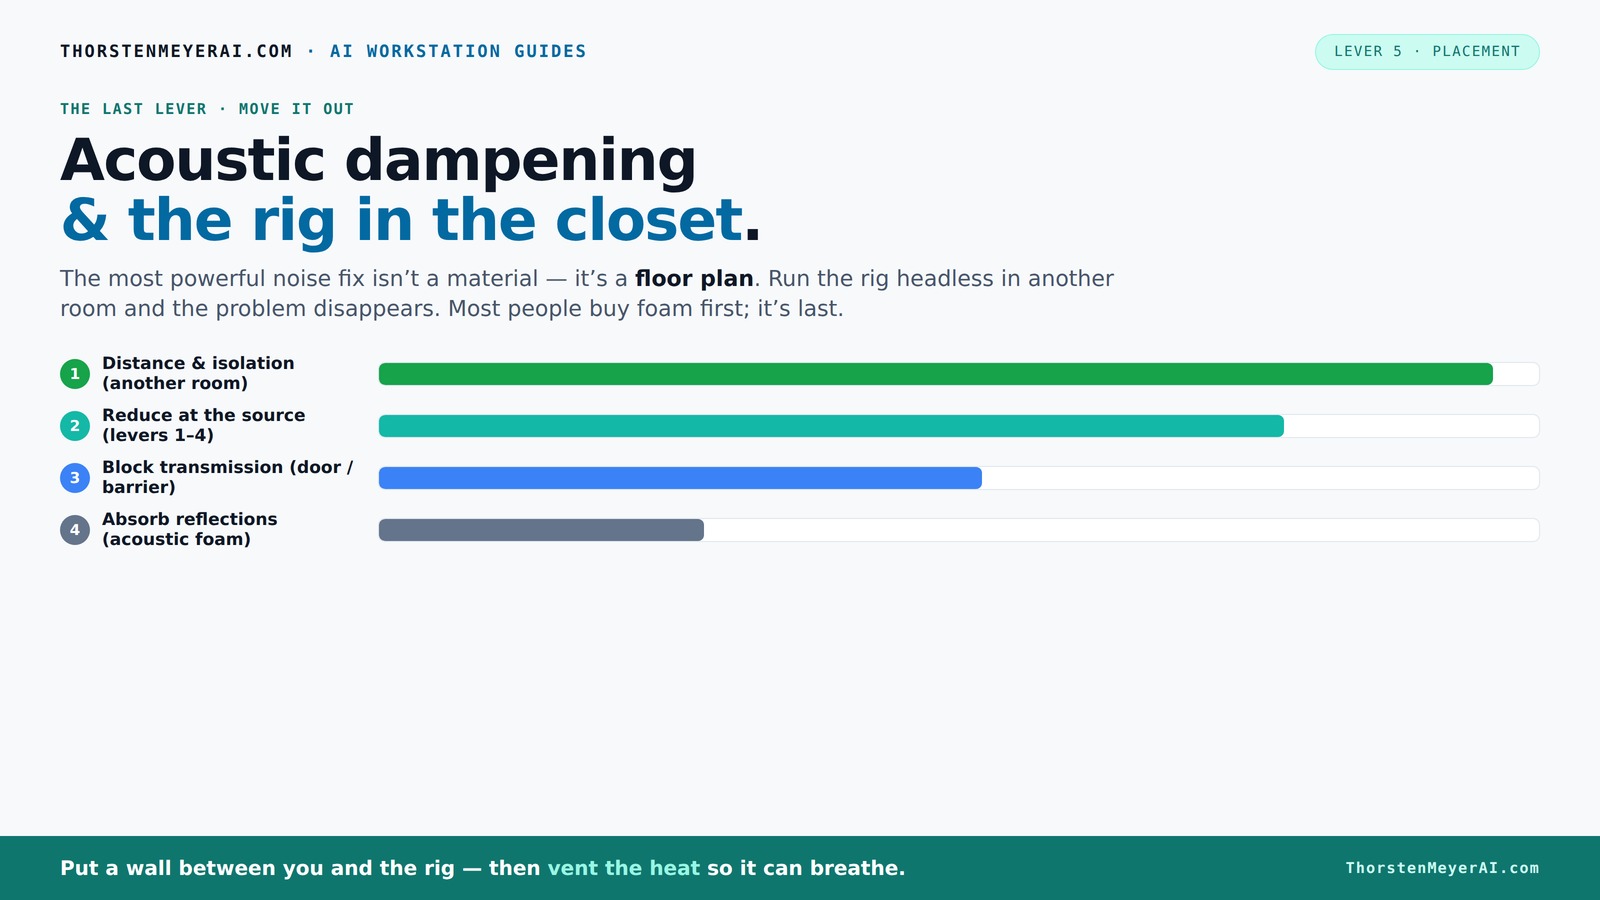
The most powerful noise fix isn’t a material — it’s a floor plan. A rig you can’t hear because it’s in another room beats any amount of foam. Tap the approaches in Part 1 to see what actually works.
(another room)
(levers 1–4)
(door / barrier)
(acoustic foam)
Contain the noise, not the heat
Key Takeaways
- Moving your rig to another room or closet can drastically cut noise without adding any absorption or treatment.
- Proper ventilation is essential in any enclosed space to prevent overheating and loud fan noise.
- Focus on first reflection points for effective sound treatment in small spaces—use a mirror to find these spots easily.
- Seal gaps around doors and vents with weatherstripping or acoustic sealant to prevent sound leaks.
- A mix of mass, absorption, and strategic placement creates the best balance between quiet and sound quality.

6 Pack Acoustic Foam Panels 12“ × 12” × 2" Egg Pattern Acoustic Wall Panels Recording Studio Acoustic Foam Panels (Black)
[Acoustic Treatment] self-adhesive acoustic panels offer a new solution for indoor acoustics,These sound proof panels effectively absorb sound...
As an affiliate, we earn on qualifying purchases.
As an affiliate, we earn on qualifying purchases.
Why Moving Your Rig is the Best Noise Solution — No Joke
The simplest fix for noisy equipment? Put it somewhere else. A rig in another room or in a closet with a door closed can be almost silent from your main workspace. Think about it: a loud GPU or fan setup in a separate room can be quieter than trying to muffle it with foam or blankets.
Many creators set up headless servers or remote workstations, connecting over the network. This way, the rig roars in the background, but your desk stays silent. It’s cheap, effective, and often the best choice for noise-sensitive tasks.
Just make sure you have a reliable wired connection and good ventilation. Moving the rig away doesn’t mean sacrificing performance — it’s about smart placement.

Weather Stripping Door Seal Strip - Soundproof Q-Shaped Foam for Exterior Door Frame, Large Gap Seal, Noise Cancelling, Easy to Install (Black, 26FT)
No light penetration: Our door seals are made of high-density foam core material, which effectively blocks light from...
As an affiliate, we earn on qualifying purchases.
As an affiliate, we earn on qualifying purchases.
The 'Rig in the Closet' Setup — How to Keep It Cool Without Noise
Putting a high-power rig in a closet sounds genius — until it overheats. Trapped heat can turn your quiet sanctuary into a furnace, causing the fans to spin up loud and fast. The trick? Ventilation.
Ensure there's active airflow: install a quiet exhaust fan, add vents, or use ducting to move hot air out. For sealed cabinets, specialized soundproof enclosures with built-in cooling exist, combining damping with temperature control (more on this here).
Remember: a sealed space traps heat. If you skip proper airflow, your rig will throttle and become louder over time. Think of it as a mini data center — it needs to breathe.

VEVOR Portable Vocal Booth, 6.56 ft Height, Portable Recording Studio with Travel Bag, Mobile Tablet Stand, Thickened Soundproofing, Sound Isolation Booth for Echo-Free Vocals, Podcasts, Voiceovers
Say Goodbye to Echoes: Built with durable Oxford cloth and acoustic padding, this recording booth for the home...
As an affiliate, we earn on qualifying purchases.
As an affiliate, we earn on qualifying purchases.
Acoustic Dampening vs. Soundproofing — Know the Difference and Why It Matters
Acoustic dampening and soundproofing are often confused, but they serve different purposes. Dampening reduces echo and reflections inside a room — making sound clearer and less boomy. Soundproofing blocks noise from escaping or entering a space.
Understanding the difference is crucial because each approach involves different materials and methods, and they often involve tradeoffs. Dampening materials like foam panels or blankets absorb sound waves, preventing reflections that cause echo and muddiness. This improves clarity and makes recordings sound more natural. However, they don’t prevent sound from leaking out or in; they just make the sound inside the space more controlled.
Soundproofing, on the other hand, involves adding mass, damping, and sealing to create a barrier that stops sound from passing through walls or doors. This often requires thicker walls, multiple layers of drywall, or specialized sealants, which can be costly and labor-intensive. The tradeoff is that soundproofing can deaden the space, making it less lively and more isolated, which might affect your monitoring or recording quality if overdone. Recognizing which method your space needs helps you allocate your resources effectively and avoid over- or under-treating your closet.

Sound Addicted - Studio Monitor Isolation Pads suitable for 6.5, 7 and 8 Inches Large Speakers | Reduce Vibrations and Fits most Stands - Pair | SMPad 8
SMPad 8 is made out of the highest quality acoustical foam (50kg/m^3 density).
As an affiliate, we earn on qualifying purchases.
As an affiliate, we earn on qualifying purchases.
Where to Place Acoustic Panels for Maximum Effect in a Small Space
Placement is everything. In a tiny closet or booth, focus on first reflection points — the spots where sound bounces directly back to your mic or ears. The easiest way? Use a mirror. Place it on the wall, and if you see your speaker or mic position in it, that’s a prime panel spot.
Target the walls at ear level, behind the mic, and the ceiling above the performer. Cover about 20-40% of the surfaces for balanced absorption without deadening the sound.
Low-frequency buildup can be tackled with bass traps, but in small spaces, more wall coverage and close-up absorption often matter more than focusing only on corners. Proper placement ensures that the sound waves are absorbed where they reflect most, preventing flutter echoes and reducing the overall reverberation time. This leads to clearer recordings and more accurate monitoring, which are critical for quality audio production.
Best Materials for Treating a Closet — What Works and What Doesn’t
Soft, dense materials are your best friends here. Think moving blankets, thick rugs, and acoustic panels. They soak up sound reflections and reduce flutter echo in small spaces.
For sealing gaps and making a closet more soundproof, weatherstripping and mass-loaded vinyl help. Adding a second drywall layer with damping compound like Green Glue can cut transmitted noise by up to 20 dB (more details here).
Avoid relying solely on foam tiles, especially cheap or thin ones. They help with reflections but won’t block sound leaks or low frequencies effectively. Instead, combine absorption with sealing strategies to address both internal reflections and external noise leaks. Using dense, heavy materials for barriers and strategic placement of absorption panels maximizes your results, making your closet both acoustically friendly and better at containing noise.
How Much Wall Coverage Do You Really Need?
In a small closet, treating roughly 20-40% of your walls and ceiling can make a noticeable difference. Focus on the first reflection points, the door, and the ceiling above. More coverage equals less echo and cleaner sound.
For example, covering the side walls at ear level and the ceiling can cut flutter echo. Adding bass traps in corners helps with low-end buildup, but small rooms tend to have less low-frequency problems than large studios.
Understanding the balance between coverage and practicality is key. Over-treating can make the space sound unnaturally dead, which can hinder your ability to judge sound accurately. Strategic placement of panels and absorption materials ensures you get the best sound quality without sacrificing natural acoustics.
Common Mistakes When Setting Up a Closet Studio — And How to Avoid Them
Don’t treat only the corners or just the ceiling. Small spaces need coverage on the most reflective surfaces, especially the side walls at ear height. Overusing foam can deaden the sound unnaturally, making recordings sound dull.
Ignoring door gaps or vent leaks lets sound escape. Using the wrong mic can also make a big difference — a dynamic mic often works better in echo-prone closets than a condenser.
Finally, don’t forget ventilation. Overheating your gear can cause more noise than a little echo, and that defeats the purpose of your setup. Proper airflow not only keeps your equipment safe but also maintains a balanced acoustic environment, preventing additional noise from fans or thermal issues. Avoiding these common pitfalls ensures your closet setup is both functional and sonically optimized.